
Fixing Denim Holes and Knees
[Ultimate Guide]
You can’t surrender your favorite pants since they got torn. Thus, you should take a stab at everything in this world to make it energetic once more. Since you have figured out how to affix it with the sewing machine and hand line, here are a couple of tips that you can use to improve your pants than at any other time.
Connect Patches with Different Shapes

Patches With Different Shapes Are a Great Way to Fix Ripped Jeans
Torn pants are the most ideal approach to ignite your imagination and make your pants alluring. Maybe than adding the patch of a similar shape and size, you can go for locally acquired patches that are accessible in various shapes. Test with various shapes and add eccentricity to your pants through patching them.
Patch It with Lace
The ribbon is a brightening texture that people add to their clothing to give an appealing look. You can utilize the ribbon patch to cover your torn region. So, you can transform your pants into a spic and span one with trim patches. Take the ribbon texture, cut it in the right shape, and patch it from within the pants.
Do the Embroidery Stitching

If you have a few openings in your pants, you can attempt weaving sewing. It will give your pants a pristine and stylish look that would not be conceivable something else. It is possible to contact your tailor or utilize any YouTube instructional exercise to begin the weaving sewing. An appealing and beautiful dress patch on your pants will make it appear to be unique from the others.
Patches for Pants with Openings
Cooler climate implies wearing pants oftentimes, and wearing pants often implies destroying pants more rapidly than you at any point expected. If your number one sets are tearing, fraying, or simply showing more mileage than you’d like, these 10 DIYs will keep them working and looking astounding the entire fall.
How to Patch an Opening in Pants without a Patch?
To anchor the opening in your pants without a noticeable patch, you will require a water-dissolvable stabilizer, a string in one tone, and a textured pin. Tear a piece of stabilizer that can cover the opening on your jean and pin it set up. Then, at that point sew the mix as you need after which you wash the stabilizer off. Eliminate the pin and dry
Steps to Patch a Hole in Jeans without a Patch

The following is a rundown of provisions required for this undertaking.
- Quality cotton interfacing
- Darning or weaving foot
- A variety of string tones to coordinate with your denim.
- Cotton wrapped with polyester is typically encouraged, however, polyester will likewise fill the need. 100% cotton isn’t sufficient.
How to patch openings in pants?
STEPS
- Assemble supplies and set up a patch sufficiently enormous to cover the opening
- Spot twofold sided tape on the patch
- Press the patch over the opening within the pants
- Sew over the opening and tenderly arrange the edges of the tear
- Cut back the edges of the patch within
- Done!
The most ideal approach to embed pants
Tidy Up the Affected Area:
Utilize your scissors to remove any fraying strings and trim around the edges of the opening (this will assist you with getting smooth progress from pants to patch).
Turn Your Jeans Inside Out:
If you are patching your pants with scrap denim and fusible, you ought to apply the patch from within. In case you are utilizing a cool iron-on patch, must apply them from an outer perspective.
Size Your Patch:

Sizing the Area to Fix Is A Must.
Slice the patch to estimate. It should cover the edges of the opening by at any rate a fourth of an inch. If the denim around the opening is debilitated, cover that region with the patch too. Else you could have another opening in an extremely short request.
Apply the Iron-On:
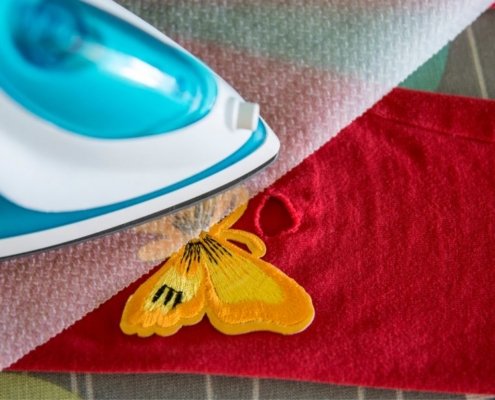
Position your pants on a pressing board so you can see the board through the opening (you would prefer not to stick your trouser leg together). Cut bits of the fusible and line the region encompassing the opening. Then, lay your patch right side looking down over the prepared region. Iron over the patch with even warmth and pressing factor. Make sure to kill the steam. The equivalent applies for an iron-on patch less the fusible (they as of now have heat delicate paste on their posteriors) and because you’re applying it to the front of your pants, you will put it face up.
Fasten It, Over and Over Again
When the patch has cooled, join over the edges in a crisscross design a few times, covering your past lines (this will keep the string from pulling out). Ensure you sew in rotating bearings as you cover. Do this multiple times over. A few specialists darn the whole patch, which means they cover the entire thing in lines.
Iron Again:
Apply a last hit of warmth and let cool. You’re doing what needs to be done here.
Trim the Edges:
Trim any free texture or strings and you’re all set.
The Most Effective Method To Patch Tore Pants
Torn pants might be sold fresh out of the box new in stores, however, if you’re not into having tears in yours, you can patch them without utilizing a sewing machine. Patching your pants with a sewing machine turns into a more confounded task, yet you can keep the action straightforward by utilizing a hand sewing method. You can make a patch from a denim material that coordinates with your torn pants, or apply a differentiating patch in an alternate tone or example.
Step 1
Remove a patch from your chose texture; make it somewhat bigger than the torn region. You can eyeball this progression by setting the texture on top of the opening in the pants and assessing the amount to cut. The shape that you cut doesn’t make any difference, since you’ll sew the patch to within the pants.
Step 2
Turn the pants back to front, so you are working with the underside of the denim – or “some unacceptable” side. Spot the texture patch on the tore region, so the example or shade of the material faces down – away from you.
Step 3
Secure the patch to the denim utilizing texture pins. The texture pins keep the patch set up as you hand sew it. Space the pins around 2 inches separated.
Step 4
String a needle with shading facilitated string – about double the length of the border of your patch – and tie a bunch toward the end.
Step 5
Utilize a straight line or a sweeping join and sew the patch to the pants, sewing around all sides of the patch. Polish off the sewing with a bunch. Since you’re sewing with the underside of the denim confronting you, the patch and bunch will not be apparent when wearing the pants.
How to sew a patch on pants?

You can patch your number one pants by sewing a patch on them where an opening has been created. More often than not the openings are created in regions where there is a great deal of mileage on the pants, similar to the knees, the seat, or close to the back pockets. Pants are moderately simple to patch when the openings are on the middle segment, yet they can be troublesome when the openings are in the legs, particularly close to the knees. A few groups like to patch their pants regardless of whether they needn’t bother with a patch. Numerous people wear embellishing patches on their pants to offer an individual expression. The cycle is equivalent to it is for patching torn pants.
How To Patch Pants Knee?
- Iron the pants (these don’t have openings yet they are extremely slim in the knees).
- Remove two coordinating with patches, they can be any shape you like.
- Lay them over the knees to check position and size.
- (discretionary) You may get a kick out of the chance to machine line a befuddle design on the knee patches to add interest.
- Presently this is the mysterious stunt to making everything a ton simpler, even on the littlest of pieces of clothing. You need to unpick the side crease of the leg. On pants pick the crease that isn’t twofold sewed. Unpick the extent that you can without unpicking the sleeve. This implies you can open the leg out level to serenely utilize the sewing machine.
- Pin patches into place.
- Presently with a string that coordinates with the shade of the patch utilizes a wide crisscross fasten (glossy silk join) to sew the patch onto the leg.
- Turn pants back to the front and resew the crease that you recently unpicked. Crisscross or serge crude edge whenever wanted.
- All done! Look at how awesome these old pants look.
Patching An Opening in Pants?
Here we will discuss the three deceives that can guarantee you to have the opening patched instantly.
Technique #1: Self-staying article of clothing tape
There is a different scope of a self-staying article of clothing tape on the lookout. Your garments likewise show up with such tapes, when you get them from the huge brands. These tapes fill in as like the scotch tape and have a covering on one side ensuring the paste on it. You can pick the right shaded or a designed piece of clothing tape from the market to browse. Get yourself oneself staying the article of clothing tape of your tone and tone and afterward take advantage of one corner of the torn region.
Stretch the region level and strip off the covering of the tape and take advantage of the hole of the gasp. Ensure that you do it while the gasp is laid straight. Else, you won’t have in any event, staying of the article of clothing tape on your gasp opening. It is compelling in the spot close to the base side of the gasp. This interaction won’t work in the space where the gasp needs to fit or stretch. Extending will make the opening open as it sticks with the assistance of paste.
Technique #2: Heat-actuated stitching tape
The market offers you to have heat-actuated trimming tapes. They come in different scopes of tones and shades. What’s more, generally they look precisely like texture. There are various surfaces in the picking of these tapes from the market. You can undoubtedly purchase these stitching tapes from the close by supermarkets or the super shops.
You need to cut a dainty piece of this material as indicated by the size of the opening and spot it close by the opening on the gasp. Make the tape and the gasp texture cover one another and place an iron on it for around 20 seconds. Ensure that you heat the iron in any case. The iron necessities around 5 minutes to warm up appropriately. Thus, heat it to the fullest to utilize it to adhere the stitching tape to the gasp opening. Save the gasp to the side for around 10 to 15 minutes to chill off appropriately. Try not to overheat the tape.
Strategy #3: Fabric patches
You can likewise utilize the texture patches to patch the openings in your jeans. There are a lot of assortments of the patches on the lookout. They are generally accessible around the ordinary staple or any shops that sell sewing things. So pick as indicated by your shading, tint, and surface to patch the opening instantly.
There can be two sorts of patches found in the market to work with. One that shows up with the warmth actuated equation and the other that doesn’t have the recipe included. You can work with both the things as indicated by your necessities and solace.
MAIN CONCERN
You don’t need to discard that old, torn pair of pants. With patches, you will wind up renovating it and if not torn, a frivolity that portrays your style explanation will make you stick out. You can likewise be sufficiently striking and join uncommon texture patches like sequin and appliquéd.
If you’re looking to patch your jeans without a sewing machine, we advise buying iron-on patches with us. They embed holes in your pants beautifully and with no complications.
 Ultimate Emblem
 Ultimate Emblem